26 December 2012

Pie #27: Christmas Pie (Pumpkin Pecan Pie)

Christmas Day 2012:
  • Delicious breakfast of blackberry ricotta scones and veggie egg casserole
  • Christmas morning jokes via the web with Serbian guests Lane and Banysha, French guests Kirsty and a few heberge, Archbold guests Bret and Wandi, and those that live here
  • Marvelous and MOM - more Christmas guests from the NW, bearing delicious dishes - tastes of old and new
  • Jackson, a witty friend and great addition to our Christmas gathering
  • Lots of hands helping to peel, chop, grate, stir, wash, and dry
  • More food than needed - each dish combining to make dinner complete
  • Leftovers boxed up for Katie, the nighttime nurse needing to sleep through dinner - the rest stored away for an impending blizzard
  • Several rounds of post-dining Scum, complete with a lesson on bragging
  • Bittersweet goodbyes - with promises of an imminent visit
  • First round of leftover dining, whether hungry or not
  • An unexpected partner swap for the nightly rounds of Euchre - more lessons about the many rules
  • Cookies and Chex-Mix eaten to fill in the cracks, or because they were simply placed too near the game table
  • Snuggling in for slumber after a wonderful day

%%%%%%%%%%%%%%%%%%%%%%%%%%%%%%%%%%%%%%%%%%%%%%%%

Pumpkin Pecan Pie
Simply in Season (at our house aka "The Season Cookbook")

Mary Beth Lind and Cathleen Hockman-Wert

Ingredients:
9-inch pastry shell

1 cup / 250 ml pumpkin or sweet potato (cooked, pureed)
3/4 cup / 175 ml light corn syrup
1 cup / 250 ml pecans (chopped)
3 eggs (beaten)
1/3 cup / 75 ml brown sugar
1/4 cup / 60 ml butter (softened)
1 teaspoon vanilla
1/2 teaspoon salt

Pie Algorithm:
1. Beat together with an electric mixer.

2. Pour into pie shell.  Bake in preheated oven at 350F / 180C until set, 45-55 minutes.

%%%%%%%%%%%%%%%%%%%%%%%%%%%%%%%%%%%%%%%%%%%%%%%%

Easy-to-make and delicious, a perfect combination!  The pie was softer and sweeter than a typical pumpkin pie, but not as sweet as a typical pecan pie.  It reminded me of sweet potato casserole - the kind with a pecan praline topping, not the marshmallow one.  A welcome addition to the end of a delicious meal!

21 December 2012

Pie #26: Halfway Pie (Pear Pie with Asiago Cheese Crumble)


It's time to celebrate - half the pies for this project have been created and consumed!  I have to admit that around Pies #16, 17, and 18 I was about ready to call it quits.  I think this probably had more to do with all the school items on my plate, but nonetheless I was nearly tired of making (and believe it or not...eating!) pie.  However, I'm back to full steam and look forward to creating and tasting something new each week!

Last week I received an email from Travis with a crumb topping recipe that I simply could not turn down!  For various reasons I tweaked the recipe slightly; my version follows.


%%%%%%%%%%%%%%%%%%%%%%%%%%%%%%%%%%%%%%%%%%%%%%%%%

Pear Pie with Asiago Cheese Crumble

Ingredients:

1 pie shell

filling:
pears
1/3 c. sugar in the raw
1 t. cinnamon
1 T. cornstarch
1/8 t. fresh-ground salt

crumble topping:
1/2 c. flour (I wanted to use whole wheat, but I was out)
1/2 c. brown sugar, packed
1/2 c. Asiago cheese, grated (next time I would make this a heaping 1/2 c.)
1/4 t. fresh-ground black pepper (next time I would do a bit less)
3 T. cold butter in chunks

Pie Algorithm:
1. Filling: Mix sugar, cinnamon, cornstarch, and salt in small bowl.  Set aside.  Peel, then thinly slice pears into pie crust.  Use enough pears to nearly fill crust.  Pour dry mixture over pears.

2. In medium-sized bowl, cut butter into flour, sugar, and pepper until butter is pea-sized.  Stir in cheese to mix.  Top the pie with this mixture, coating well.

3. Bake for 10 min at 425F, then turn heat down to 350F and bake for 40-50 min more or until filling is bubbling and thick.

%%%%%%%%%%%%%%%%%%%%%%%%%%%%%%%%%%%%%%%%%%%%%%%%%


My first response to this pie was WOW!  Often while pies are baking I like to turn on my oven light to watch them.  Many times the smell is as lovely as the view.  This time, the baking experience was extreme - the aroma of the cheese was almost unbearable (in a good way).  Multiple times I found myself wandering into the kitchen, drawn in by the smell of the warm Asiago.  It was the first time that I simply could not wait to try the result!

I am not disappointed!  The texture of the soft pears combined with the crunchy topping is delightful.  In parallel, the sweetness of the filling combined with the savory topping cannot be beat!  The flavor of the cheese is subtle but not absent; the pepper gives the pie a bit of a warm kick.  I definitely recommend eating the pie warm, and with a dollop of whipped cream if you so desire.  This pie is not recommended for all audiences; I understand that some people only like sweet pies.  However, I definitely will keep it in my repertoire!

13 December 2012

Pie #25: FFA Pie (Grapefruit Pie)

I think I have finally found a pie Perry won't eat!  Before the big reveal, let me remind you that he didn't have a problem with Pie #5 that had zucchini,  Pie #8 that had corn milk, or Pie #16 that had green tomatoes.  One would think that after all these weird ingredients that he'd be up for anything, but one would be wrong.  Perry is not excited about eating...Grapefruit Pie.

Grapefruit seems to be a food that people either love or hate.  I love it - Perry hates it.  Granted, the pith and inner membrane of the grapefruit are very bitter.  However, when these are removed and you bite into a juicy section of pure grapefruit flesh...WOW - an excellent combination of sweet and tart!

You may be wondering, "Why grapefruit pie?  Have you run out of ideas?"  This pie actually comes from surplus rather than from a shortage.  As mentioned above, I love grapefruit.  Thus when Perry's cousins are selling fruit to support their FFA Chapter, I always purchase a partial case.  However I was a bit overeager this year, and ended up with an entire case!  Yes folks, that means I have 40+ grapefruits to savor...or at least to eat as fast as I can while they are still good!  Kathy mentioned that she had eaten jello recently with grapefruit pieces in it.  Combining this idea with the idea of strawberry jello pie that I enjoyed as a kid, I had the pie of the week!

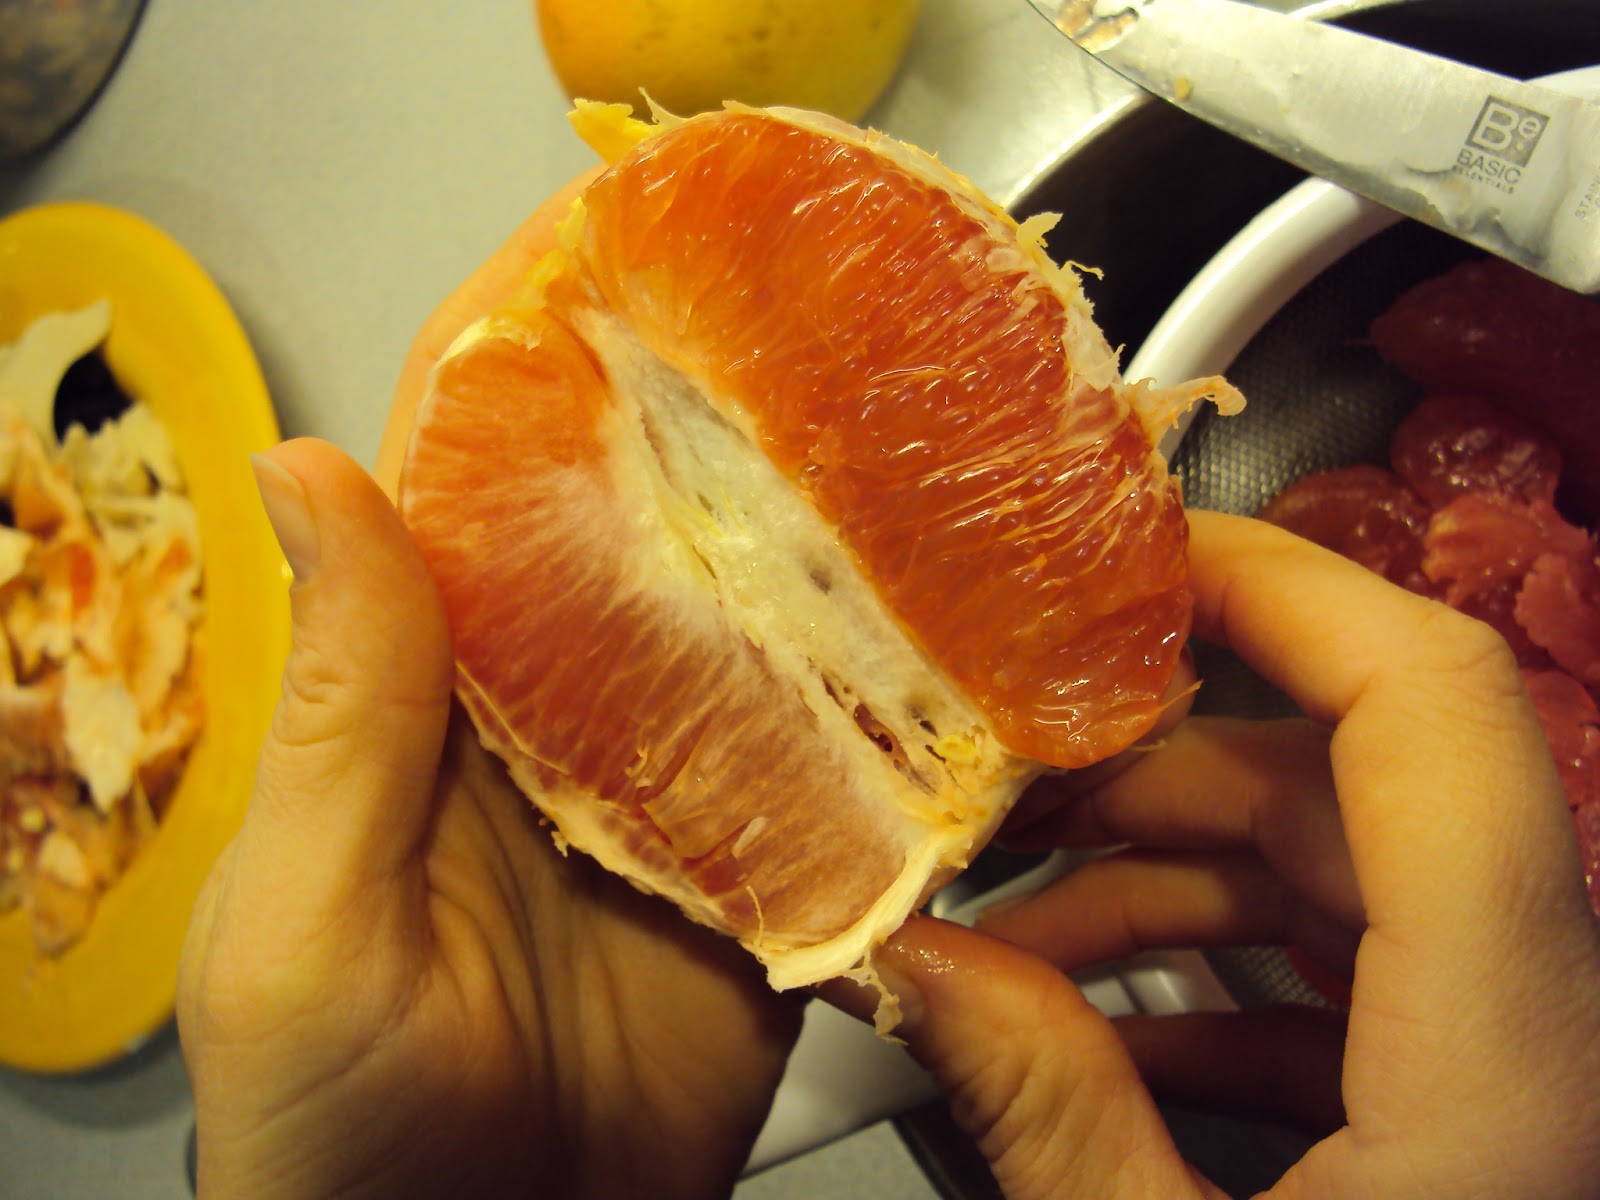
I have good childhood memories of Wanda standing at the sink sectioning grapefruits for the family to share.  You can find a plethora of tutorials online teaching you how to section a grapefruit, but none are quite like Wanda's method.  When sectioning grapefruit, I always use her method.  In case you are interested, there are step-by-step instructions and pictures below.

##################################################################################

1. Peel the tough outer skin from the grapefruit - there is no need to pull off all the extra white pith that remains.  Separate the grapefruit into two parts.


2. Slide a knife just under the top layer of skin in the center of the fruit. 


3. Once you make a slit in the center, the skin will pull away easily from that section.  Pull away all skin covering the section on which you are working.  There may remain a bit of skin on the outside edge of that section - this is ok!


4. Separate the exposed flesh from the remaining sections.  Two techniques that work well are sliding your thumb under the flesh near the middle of the fruit (in the area where you made the slit), or leveraging the fruit from the outside edge (see picture).


5. Lastly, pull the fruit from the skin that remained on the outside edge of the section.  Repeat from Step 2 until the entire grapefruit is sectioned.


##################################################################################

This method takes a bit of practice, but eventually you can do a whole grapefruit quickly without damaging any of the sections.  Sectioning grapefruit for this pie is a good way to practice - you need to section four grapefruits and it doesn't matter if the flesh comes out in small pieces instead of whole sections.

When browsing for recipes to use, I found a recipe on a blog entitled Making a Living.  This recipe uses strawberry jello, which masks the grapefruit flavor.  For some this may be a positive thing...for me, not so much.  Therefore, I chose to create my own recipe using non-flavored gelatine and fresh-squeezed grapefruit juice.

%%%%%%%%%%%%%%%%%%%%%%%%%%%%%%%%%%%%%%%%%%

Grapefruit Pie

Ingredients:
1 9-inch blind-baked pie crust

6 grapefruits
2, 1-oz. envelopes Knox (unflavored) Gelatine
1/2 c. sugar

whipped topping (see Pie #3)

Pie Algorithm:
1. Place a medium-sized strainer inside a bowl.  Peel and section 4 grapefruits (see method above).  As you are sectioning the grapefruits, tear the sections into small, thumb-width sized chunks.  Place these sections in the strainer.  When finished sectioning, set this bowl aside to collect the excess grapefruit juice dripping from the chunked sections.

2. Juice the remaining two grapefruits.  (I ended up running my juice through a strainer to collect all the small seeds that fell into the juice.)  Put 1/2 cup of the juice in a large heat-proof bowl - set aside.

3. Combine sugar and 1 cup of remaining juice in a saucepan.  Place on medium-high heat until boiling, stirring occasionally.  Approximately 1 minute before boiling (make your best guess on the timing), sprinkle the two Knox packets over the cold juice waiting in the large bowl.

4. When juice mixture boils, stir it into the cold juice and gelatine mixture.  Stir until gelatine dissolves completely - around 5 minutes.  Let juice cool slightly, then mix in the sectioned grapefruit.  Pour grapefruit and gelatine into pie crust.  (Any remaining mixture can be put in a bowl to eat separately!)  Place pie in fridge and wait for gelatine to solidify.

5. Cover with whipped topping before serving.

%%%%%%%%%%%%%%%%%%%%%%%%%%%%%%%%%%%%%%%%%%

 
Biting into this pie is like biting into a solid chunk of pie-shaped grapefruit.  The flesh is very juicy, and the gelatine blends in nicely.  For someone seeking a very sweet dessert, more sugar would be needed.  The whipped topping helped with the tartness, though I would be happy to eat the pie without the topping!  As is, the flavor of the pie is simply the flavor of the grapefruit.  For what more could I ask?

08 December 2012

Pie #24: Operations Research Pie (Brown Sugar Buttermilk Pie)


In undergrad one of my favorite courses was Operations Research.  For me this course was an introduction to the use of optimization in complex decision-making processes.  I LOVED this course as solving the problems was always like solving a fun scheduling puzzle.

This morning while working on the week's pie I felt a bit like I was back in operations research mode.  I had certain projects I was trying to finish, I needed to run several errands, and I only had a certain amount of time to complete everything.  In the end, I won!  I solved the scheduling puzzle and was able to finish everything on my list in the allotted time.

This week's pie again came from Ashley English's book A Year of Pies: A Seasonal Tour of Home Baked Pies.  However, this recipe was submitted by a guest author named Tom Mazurek.  There are a few notes I would like to add to the recipe.  First, I added the cinnamon to the recipe below.  Second, the pie expands tremendously.  When I first poured the filling in the crust, I was afraid that the pie wasn't going to be thick enough.  However, while the pie was baking, it expanded to 2 inches higher than the crust.  (It sank back to normal size as it cooled.)


%%%%%%%%%%%%%%%%%%%%%%%%%%%%%%%%%%%%%%%%%%%%%%%%

Brown Sugar Buttermilk Pie
Tim Mazurek
www.lottieanddoof.com

Ingredients:

single 9-inch pie crust

3 large eggs
1/3 c. sugar
1/2 c. (packed) light brown sugar
2 T. flour
6 T. butter, melted and cooled
1 c. buttermilk
1 t. vanilla
1/2 t. ground nutmeg
pinch of salt
dusting of ground cinnamon

Pie Algorithm:
1. Preheat the oven to 375F.  In large bowl, whisk the 3 eggs with both sugars and the flour, making sure there are no lumps.  Add the melted butter, buttermilk, vanilla, nutmeg, and salt.  Whisk to combine.

2. Pour the filling into the prepared crust and dust with cinnamon.  Place in the preheated oven.  Turn the oven down to 325F and bake for 45-60 minutes, or until the edges are set and the center is still a little wobbly.  Remove the pie from the oven and let it cool for at least 30 minutes before serving warm or at room temperature.

%%%%%%%%%%%%%%%%%%%%%%%%%%%%%%%%%%%%%%%%%%%%%%%%


I debated on naming the pie 'Meh Pie' as I wasn't super impressed with the results.  It ended up with the consistency of a custard, but the filling wasn't very exciting.  Instead it was rather bland.  The edges got a bit darker than I had hoped, but I'm not really sure how to counteract this since it had risen so high.  Overall Perry has been pretty positive about the pies I've made for this project.  However, this time he commented that he wouldn't pick this pie if he had a choice. 

01 December 2012

Pie #23: Cookie Sunday Pie (Salted Pecan Mini Pies)

I've come to the point in my pie project where I'm not willing to make a pie until I have pie-eaters lined up.  Contrary to what Perry may tell you when I'm not around, he and I cannot eat all the pies that are flying out of my kitchen!  Thus, when I received an email from the church office to remind us that this is our month to contribute cookies for Cookie Sunday, I knew where my pie(s) were going to go!

Cookie Sunday happens at Columbus Mennonite on the first Sunday of every month.  Attendees gather after the service to munch on snacks (cookies, fruit, crackers, ... this month mini pies, etc) and drink coffee and tea.  This is a great time to catch up with people you know, as well as a time to talk to those in the congregation whom you don't know as well.

This week's recipe came from A Year of Pies: A Seasonal Tour of Home Baked Pies by Ashley English.  I've been on the library waiting list for this book since it came out in August, and finally worked my way to the top.  I really like that the recipes in the book are separated by season, and look forward to trying several of them!  Actually to be truthful, based on all the beautiful pictures in the book,  I'm having a hard time not trying ALL of the recipes!  I had some quantity issues with the recipe - the recipe states that it makes 36 mini tarts, but I was only able to get around 26 tarts.  I've changed the recipe slightly to reflect what I used for 24 tarts, as well as to simplify the directions in some parts.


%%%%%%%%%%%%%%%%%%%%%%%%%%%%%%%%%%%%%%%%%%%%%%%%

Salted Pecan Mini Tarts
From: A Year of Pies: A Seasonal Tour of Home Baked Pies
by: Ashley English

Ingredients:
enough dough to make one 9-inch pie crust

filling:
1/2 c. (packed) light brown sugar
2 T. unsalted butter, melted
1 large egg
1/2 t. vanilla extract
1/2 t. ground nutmeg
1/4 t. sea salt
3/4 c. pecans, chopped

1 T. coarse sea salt, for sprinkling

Pie Algorithm:

1. Prepare the crust
Roll out the chilled dough on a lightly floured surface into a 12- or 14-inch circle.  Cut out 24 rounds, using a 2 1/2 inch round biscuit or cookie cutter.  You may have to reroll the dough scraps several times to cut out all the rounds.  Do so quickly, as the more the dough is rolled, the more it activates the gluten in the wheat, which can result in toughened dough.

Place one dough round in each mini tart pan.  (See the picture of the little stirrups Perry made so we could slide these little guys right out when they were finished!)  Press the dough flat against the bottom and up the sides of the pan.

Put the tart pans in the refrigerator to chill for 20 minutes.  Meanwhile preheat the oven to 325F.

Bake the chilled crusts for 8 minutes.

Remove the baking sheets from the oven.  Turn the heat up to 375F.  Set the mini tart crusts aside to cool while you prepare the filling.


2. Prepare the filling
Combine the brown sugar, butter, egg, vanilla, nutmeg, and salt in a medium-sized bowl.  Whisk to blend thoroughly, then stir in the chopped pecans.


3. Assemble the mini tarts
Spoon 1 1/2 t. of the filling into each mini tart shell, then sprinkle each with several granules of coarse sea salt.

Bake in the 375F oven for 25 minutes, until the tops are lightly browned.

Cool the mini tarts at least 15 minutes before serving.

%%%%%%%%%%%%%%%%%%%%%%%%%%%%%%%%%%%%%%%%%%%%%%%%

Cutting out all the little crusts takes quite a bit of time, but the filling is so quick and easy the entire process isn't too bad.  Let's hope the 'cookie eaters' like them in the morning!

Update: I couldn't wait any longer to give one a taste!  Sadly, I found my cute little pie to be a bit dry.  I think it would have been fine with a good cup of coffee, but it was way to late for me to be drinking coffee!  Also, I thought the nutmeg overpowered the rest of the flavors; Wanda disagreed.  At any rate, I think I would try this again, baking them for less time.